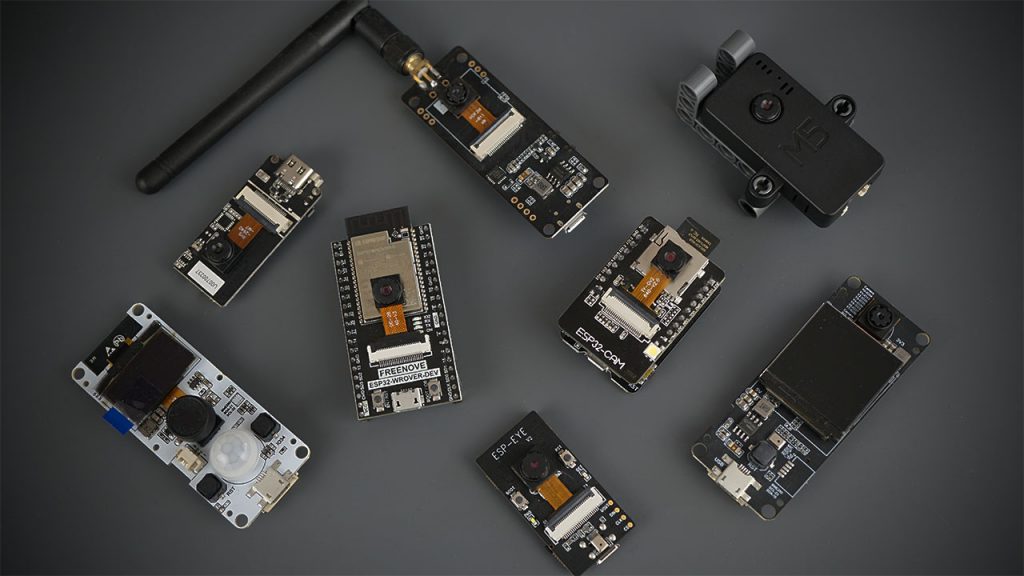
ESP32 development boards with a camera are becoming very popular among the maker community. There are several models with different features like microSD card support, microphone, screen, and much more for a very reasonable price. These boards allow you to build projects with image, video streaming, face recognition and detection, and other AI applications. Do you know what’s the best ESP32 camera board for your project?
In this article, we’ll compare several ESP32 development boards with a camera, so that it’s easier to pick up the right board for your needs.
ESP32-CAM Comparison Table
The following table compares the most important aspects of 8 different ESP32 camera development boards (Note: the table scrolls horizontally).
Camera Model | AI-Thinker | Freenove Wrover | ESP-EYE | M5-Camera A/B | TTGO T-Plus | TTGO T-Camera | T-Journal | M5 ESP32-Camera |
|---|---|---|---|---|---|---|---|---|
 |  |  |  |  |  |  |  |
|
Where to Buy | ||||||||
PSRAM | 4MB | 4MB | 8MB | 4MB | 8MB | 8MB | x | x |
Screen | x | x | x | x | 1.3inch TFT display (ST7789) | 0.96inch SSD1306 OLED | 0.91inch SSD1306 OLED | x |
MicroSD Card | ✓ | ✓ | x | x | ✓ | x | x | x |
Microphone | x | x | ✓ | ✓ (add-on) | ✓ | x | x | ✓ (add-on) |
Function button | x | x | ✓ | x | x | ✓ | ✓ | ✓ |
Battery Connector | x | x | x | x | ✓ | ✓ | ✓ | ✓ |
Built-in programmer | x | ✓ | ✓ | ✓ | ✓ | ✓ | ✓ | ✓ |
GPIOs | 10 | 30 | x | x | 2 | x | 4 | x |
Motion sensor | x | x | x | x | x | ✓ | x | x |
Grove connector | x | x | x | ✓ | ✓ | ✓ | x | ✓ |
More info |
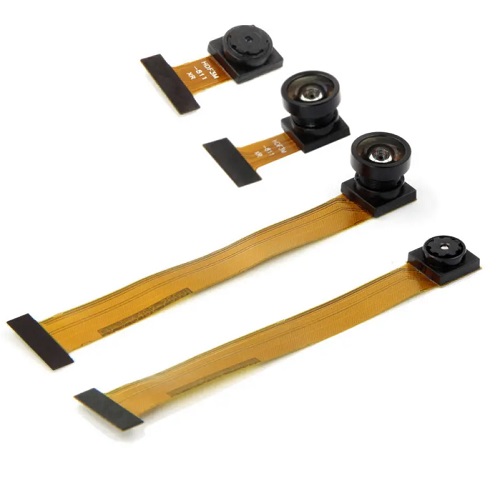
All cameras have an OV2640 camera and usually, these come with a small flex cable. There are camera probes sold separately with longer flex cables and with a fish-eye lens. The fish-eye lens capture a wider area, which is really useful for surveillance projects.
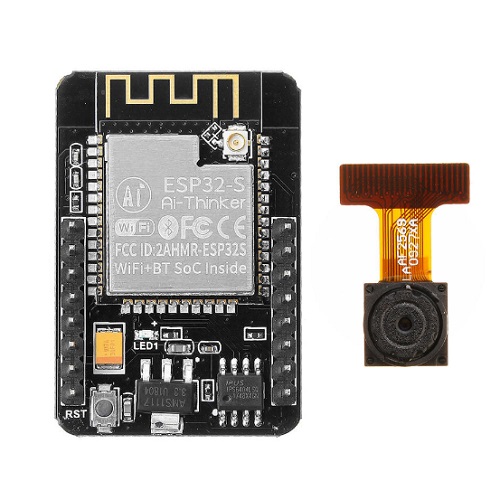
ESP32-CAM AI-Thinker
Banggood - ESP32-CAM ESP32 WIFI Bluetooth Development Board With OV2640 Camera Module
$9.99 out of stock
The ESP32-CAM AI-Thinker is one of the most popular ESP32 development boards with a camera – it comes with a lot of useful features and costs around $7 or less!
It features an ESP32-S chip and comes with a “regular” 2MP OV2640 camera. This board has 4MB PSRAM, which is used for buffering images from the camera into video streaming or other tasks and allows you to use higher quality in your pictures without crashing the ESP32.
It supports a microSD card and has 10 accessible GPIOs and power pins. However, not all GPIOs can be used because some are either being used by the camera or by the microSD card. So, you need to be careful with which GPIOs you’ll use.
The ESP32-CAM board comes with an on-board antenna, but also with an IPEX connector allowing you to alternatively use an external antenna to improve the Wi-Fi communication range.
The board comes with an on-board reset button to restart your board and a built-in LED that works as a flash lamp. The flash lamp can be useful to light up the area before streaming video or taking a picture. However, the flash lamp shares its GPIO with one of the microSD card GPIOs. This means that when using functions related to the microSD card, the LED will light up occasionally, even when you don’t want it.
One of the major drawbacks of the ESP32-CAM is that it doesn’t have USB-to-UART interface. This means that you can’t connect the ESP32-CAM directly to your computer using a USB cable. You need to use an FTDI programmer. Nonetheless, this is one of the most versatile and cheapest ESP32 development boards with a camera.
- Read our complete review of the ESP32-CAM Ai-Thinker board.
- Get Started with the ESP32-CAM using our resources: ESP32-CAM AI-Thinker Projects.
- Most Common Problems with the ESP32-CAM and How to Fix Them

Freenove ESP32-Wrover CAM Board

This development board comes with the ESP32-Wrover-E chip (with PSRAM). It comes with the OV2640 camera and it is easy to use and set up. It has a USB-to-UART converter so it’s straightforward to upload code to the board. You just need to connect a USB cable to the board and connect it to your computer to upload code or apply power. There’s no need for extra circuitry or an FTDI programmer.
It comes with several exposed GPIOs if you want to connect other peripherals. Additionally, if you’re not using the camera, you can use it as a regular ESP32 with a wide number of available GPIOs. It comes with RESET and BOOT buttons, which makes it easy to reset the board or put it in flashing mode if needed.
This board is very handy, the only downside is that it doesn’t come with a microSD card slot. However, as it comes with a wide number of available GPIOs, you can easily connect an external microSD card module if needed.
When programming this board using Arduino IDE, make sure you select the board ESP32 Wrover Module and in the partition scheme select Huge APP (3MB No OTA/1MB SPIFFS).
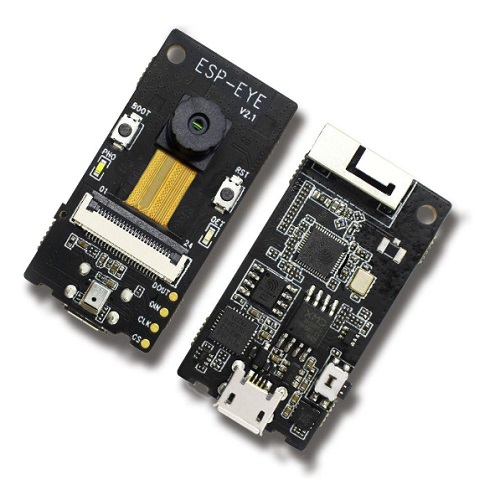
ESP-EYE
Banggood - ESP-EYE ESP32 Wi-Fi and Bluetooth AI Development Board
$43.36
The ESP-EYE is an ESP32-based board dedicated to artificial intelligence (AI) with voice wake-up and face recognition.
Just with 21mm by 41mm, it is equipped with a 2 MP OV2640 camera, on-board microphone, reset, boot, and function buttons, and two LEDs. It features 4MB Flash, 8MB PSRAM, and a Micro USB type-C connector (easy to upload code). It comes with on-board antenna and IPEX connector if you want to add an external antenna.
One of the greatest advantages of this board is the USB type-C connector—fast and easy to upload code to the board; the microphone allows you to add voice features to your projects; and 8MB PSRAM ensures that your board doesn’t crash when using higher image quality settings. The major drawback is the price.
Read our in-depth review of the ESP-EYE board.

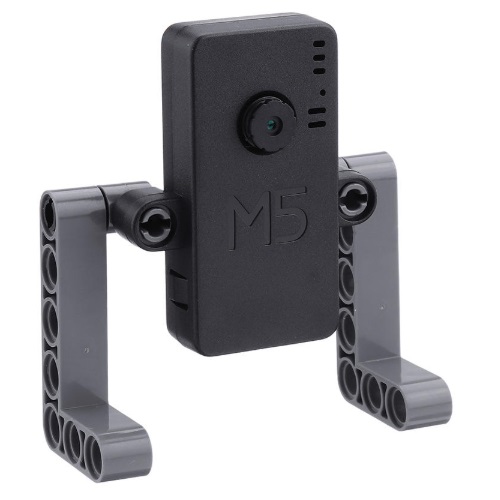
M5-Camera Model A/B
Banggood - Mini ESP32 Camera Development Board WROVER with PSRAM Camera OV2640 USB Type-C
$35.79 out of stock
There are several different versions of M5-Stack ESP32 boards with cameras. The M5-Camera A or M5-Camera B like all the other boards featured here comes with the OV2640 camera. It has 4MB PSRAM—so, you shouldn’t have problems taking pictures and streaming with higher quality.
It comes inside a LEGO-style enclosure and features a grove connector ideal to connect other M5-Stack expansions like a microphone, the MPU6050 gyroscope/accelerometer, or a BME280 temperature, humidity and pressure sensor.
The USB type-C connector makes it easy and fast to upload new code to the board. It comes with an external RST button to restart the board and doesn’t have exposed GPIOs.
The greatest advantage of this board is that it has a more finished project look when compared with the other boards. It doesn’t have visible electronics components or wires and if you want to add a BME280 sensor, a gyroscope, or a microphone, you won’t have any wires, you just need to use the grove connector.
Like all the other cameras, it can be programmed using Arduino IDE. Just make sure that you have the right pinout for your camera board.
For more information and a comparison between ESP32 camera boards from M5-Stack, we recommend taking a look at this GitHub page.
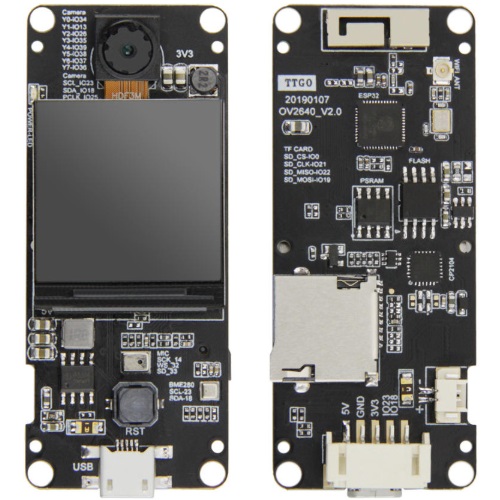
TTGO T-Camera Plus
Banggood - TTGO T-Camera Plus ESP32 with 1.3 Inch Display
$36.79 out of stock
The TTGO T-Camera Plus comes with all the functionalities we would want in such a development board and for a very reasonable price. The board comes with microSD card support, a microphone, support for a 3.7V lithium battery as well as a battery management circuit, a 1.3 TFT display (color screen), microUSB interface, and on-board reset button.
It comes with some exposed GPIOs that were used to connect to an on-board BME280 sensor. However, the sensor would get really hot on the board, so the manufacturer decided to remove the sensor but you still get access to the GPIOs, so you can connect other I2C peripherals. These GPIOs are also accessible via grove connector.
Finally, the board has an on-board antenna, but also an IPEX connector if you want to add an external antenna. When we got our board it came loaded with an example that shows what the camera “sees” on the screen. This is a very versatile board and we really like it. Read our in-depth review of the TTGO T-Camera Plus.

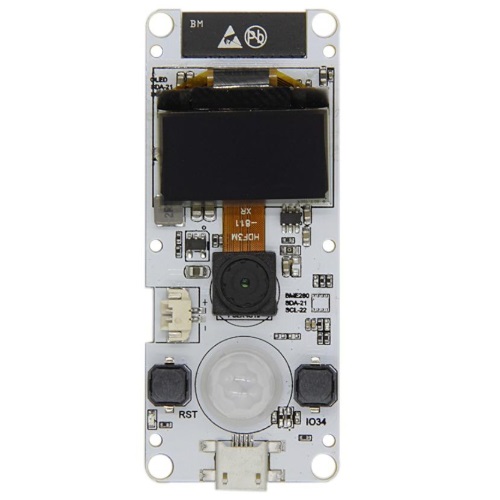
TTGO T-Camera with PIR Motion Sensor
Banggood - TTGO T-Camera ESP32 WROVER with PSRAM Camera Module OV2640 Camera 0.96 Inch OLED
$24.99 out of stock
This camera features a OV2640 camera, a 0.96 inch SSD1306 OLED display, a grove connector (ideal to connect I2C devices), a battery connector, a PIR motion sensor, an on-board RESET button, and a function button connected to GPIO 34. It also features 8MB PSRAM, but it doesn’t support a microSD card.
If you want to include some motion detection in your projects, this is the camera to go with. For more details, you can take a look at the camera GitHub page.

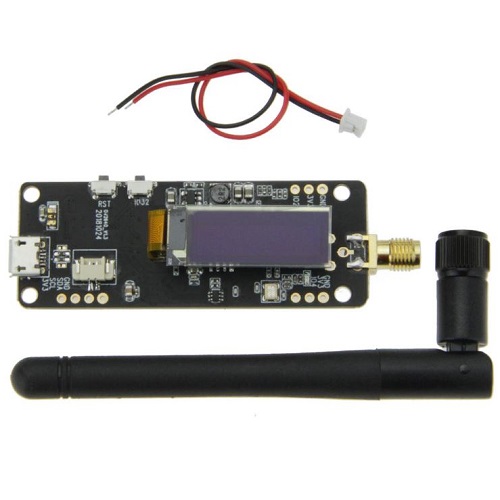
TTGO T-Journal
Banggood - TTGO T-Journal ESP32 Camera Development Board Antenna 0.91 OLED
$25.59 out of stock
The TTGO T-Journal is a $12-$15 ESP32 Camera Development Board with an OV2640 camera, an external antenna, an I2C SSD1306 0.91 inch OLED display, some exposed GPIOs, function button, a battery connector, and a micro-USB interface.
The OLED display is a great addition to the board. You can display the board IP address, or any errors while debugging. There are four accessible GPIOs. Two of them are for I2C communication and the other two are perfect to connect servo motors (you can also connect other peripherals).
This board also comes with a connector to connect a 3.7V lithium battery. Uploading code is easy with this board because it comes with a USB connector that can be used both for uploading code and for power. You also have a function button connected to GPIO 32 that you program in your code to trigger any task you want.
Its major drawbacks are: it doesn’t have microSD card support or external PSRAM, which makes it a little bit limited in terms of processing.
Note: at the moment, it’s a bit difficult to get this board. I think this board won’t be produced anymore and it’s currently not available to buy on places like amazon. It’s better to get a board with PSRAM.
Either way, if you have one of these boards, you can find more details about it at the following links:
- TTGO T-Journal ESP32 Camera Development Board Review
- Getting Started with the TTGO T-Camera (with examples)
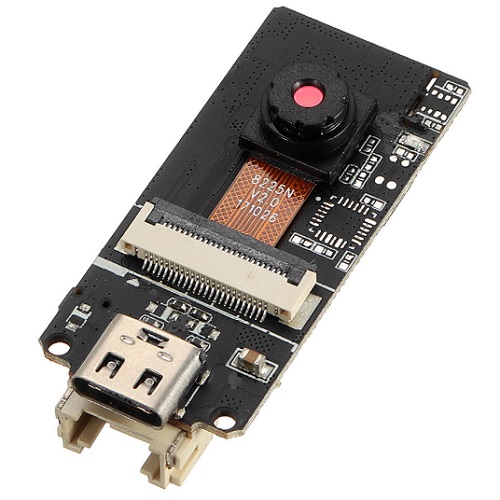
M5-Stack Camera without PSRAM
Banggood - ESP32 Camera Module Development Board OV2640 Camera USB Type-C
$23.09 out of stock
This is another ESP32 board with a camera from M5-Stack. This ESP32-Camera doesn’t have PSRAM. In practical terms, this means the camera is not able to do face recognition and detection and doesn’t support picture resolution higher than SVGA (800×600). You may also have a hard time with video streaming. Some people reported that his camera heats up very fast with video streaming. Usually, when you get one of these boards, you also get a heat sink precisely because of that.
Like other M5-Stack boards, it has a grove connector, so it is easy to add M5-Stack expansions like a microphone, accelerometer, or BME280 sensors. Additionally, it has a USB-C connector that you can use to upload code or apply power.
Wrapping Up
In this article, we’ve reviewed 8 different ESP32 camera development boards. All boards feature the OV2640 2MP camera and you can program them using Arduino IDE. The best camera for you will really depend on your project requirements. We compiled all this information so that it’s easier for you to pick up the best board for what you have in mind.
In our opinion, the ESP32-CAM AI-Thinker is the most versatile for beginners (and it’s also cheaper) but it needs an FTDI programmer to upload code, or an ESP32-CAM MB programmer. If you don’t want to use the FTDI programmer there are other boards to choose from, I personally like the Freenove ESP32 Wrover board.
The TTGO T-Plus is the one with more functionalities: microphone, microSD card, a color screen, and much more. If you don’t intend to connect any peripherals to your board, the M5-camera might be a better option (and you can easily connect other M5-stack expansions). At this point, taking into account the variety of available boards, I would not choose a board without PSRAM.
We hope you’ve find this comparison between boards useful.
Try our ESP32-CAM Projects:
- Video Streaming, Face Detection and Face Recognition
- ESP32 IP CAM – Video Streaming (Home Assistant and Node-RED)
- Take Photo and Save to MicroSD Card
- PIR Motion Detector with Photo Capture
- Take Photo, Save to SPIFFS and Display in Web Server
- ESP32-CAM AI-Thinker Pinout Guide: GPIOs Usage Explained
- Build ESP32-CAM Projects (eBook)
- Read all our ESP32-CAM Projects, Tutorials and Guides
Thanks for reading.
[Recommended Course] Learn ESP32 with Arduino IDE
Register in our brand new ESP32 course with Arduino IDE. This is our complete guide to program the ESP32 with Arduino IDE, including projects, tips, and tricks! The registrations are open, so sign up now.
 [eBook] Home Automation using ESP8266 »
 [Course] Build a Home Automation System »
 [Course] Arduino Step-by-Step Projects »
There is also Arducam IoTai ESP32 amazon.com/gp/product/B07W8SMFTK , which I personally enjoy using.
Hi Gerard.
Thanks for your comment.
I didn’t know about that camera. Thanks for sharing.
Regards,
Sara
I have been wandering what the difference was between these ESP32 development boards with camera. Thanks for another clear concise article.
Great!
We’re glad you liked it!
Regards,
Sara
Guaooo!!! Perfecta explicación, son los mejores en este segmento sin lugar a dudas. Me aclararon muchas dudas., gracias por tomarse el tiempo para recortar nuestra brecha de aprendizaje.
Nota: Compre un esp32 Cam no Thinker, todo funciona perfectamente excepto que el video no se mantiene. Ya lo coloque (esp32 cam) cerca del Reuters y nada la imagen sñse mantiene por pocos segundos y luego desaparece. Pueden sugerirme algo??? Gracias y nuevamente reiteró su compromiso desinteresado por los que de alguna forma u otra nos apasiona este mundo electrónico y sobre todo IOT.
Hi.
I suggest that you take a look at this troubleshooting guide: https://randomnerdtutorials.com/esp32-cam-troubleshooting-guide/
Regards,
Sara
Hello
Thanks for the well written article. I feel fairly knowledgeable about esp32 cam already!:).
I have a project that deals with building a system that can take snapshot of a junction’s traffic lanes,use machine learning to identify the traffic density in the image and make decisions about which lane should have right of way based on comparative density of the lanes, with the most conjested lane passing first….
I just want to ask if & which of the esp32 camera can I use for such a project. Thanks in advance.