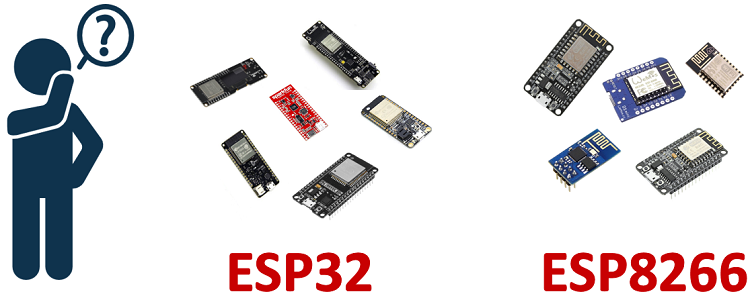
What’s the difference between ESP32 and ESP8266? Should you use the ESP32 or the ESP8266 in your projects? In this article, we’ll compare the ESP32 with the ESP8266 and cover the pros and cons of each board.
The ESP32 and ESP8266 are cheap Wi-Fi modules perfectly suited for DIY projects in the Internet of Things (IoT) and Home Automation fields.
Both chips have a 32-bit processor. The ESP32 is a dual-core 160MHz to 240MHz CPU, whereas the ESP8266 is a single-core processor that runs at 80MHz.
These modules come with GPIOs that support various protocols like SPI, I2C, UART, ADC, DAC, and PWM. The best part is that these boards come with wireless networking included, which makes them apart from other microcontrollers like the Arduino. This means that you can easily control and monitor devices remotely via Wi-Fi or Bluetooth (in the case of ESP32) for a very low price.
Alternatively, if you don’t need to use its wireless capabilities, you can use the ESP32/ESP8266 to control inputs and outputs as you would do with an Arduino. However, you should take into account that whereas the Arduino works with 5V logic, the ESP32 and ESP8266 work at 3.3V.
Specifications: ESP32 vs ESP8266
The ESP32 is the ESP8266 successor. It adds an extra CPU core, faster Wi-Fi, more GPIOs, and supports Bluetooth 4.2 and Bluetooth low energy. Additionally, the ESP32 comes with touch-sensitive pins that can be used to wake up the ESP32 from deep sleep, a built-in hall effect sensor, and a built-in temperature sensor (recent versions of the ESP32 don’t come with a built-in temperature sensor anymore).
Both boards are cheap, but the ESP32 costs slightly more. While the ESP32 can cost around $6 to $12, the ESP8266 can cost $4 to $6 (but it really depends on where you get them and what model you’re buying).
The following table shows the main differences between the ESP8266 and the ESP32 chips (table adapted from AMICA_IO).
ESP8266 | ESP32 |
|
|---|---|---|
 |  |
|
MCU | Xtensa Single-core 32-bit L106 | Xtensa Dual-Core 32-bit LX6 with 600 DMIPS |
802.11 b/g/n Wi-Fi | HT20 | HT40 |
Bluetooth | X | Bluetooth 4.2 and BLE |
Typical Frequency | 80 MHz | 160 MHz |
SRAM | X | ✓ |
Flash | X | ✓ |
GPIO | 17 | 34 |
Hardware /Software PWM | None / 8 channels | None / 16 channels |
SPI/I2C/I2S/UART | 2/1/2/2 | 4/2/2/2 |
ADC | 10-bit | 12-bit |
CAN | X | ✓ |
Ethernet MAC Interface | X | ✓ |
Touch Sensor | X | ✓ |
Temperature Sensor | X | ✓(old versions) |
Hall effect sensor | X | ✓ |
Working Temperature | -40ºC to 125ºC | -40ºC to 125ºC |
Price | $ (3$ - $6) | $$ ($6 - $12) |
Where to buy |
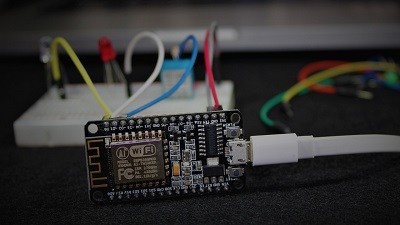
Using ESP32 or ESP8266 bare chips is not easy or practical, especially when testing and prototyping. Most of the time, you’ll want to use ESP32 and ESP8266 development boards. These boards come with all the needed circuitry to power the chip, connect it to your computer, a circuit to upload code easily, pins to connect peripherals, built-in power and control LEDs, and other useful features.
The ESP32 and ESP8266 development boards we use more often are the ESP32 DEVKIT DOIT Development board and the ESP8266 ESP-12E NodeMCU Kit and these are the ones we recommend for beginners. However, there are many other models of development boards that you can choose from. We recommend that you read the following guides:
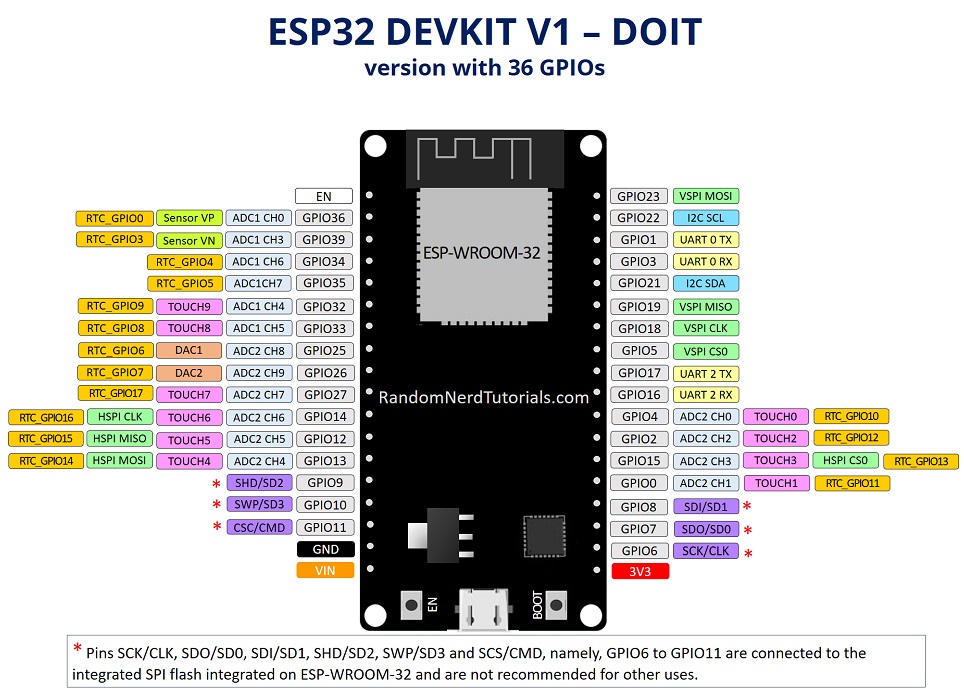
More GPIOs on the ESP32
The ESP32 has more GPIOs than the ESP8266, and you can decide which pins are UART, I2C, SPI—you need to set that on the code. This is possible due to the ESP32 chip’s multiplexing feature that allows you to assign multiple functions to the same pin.
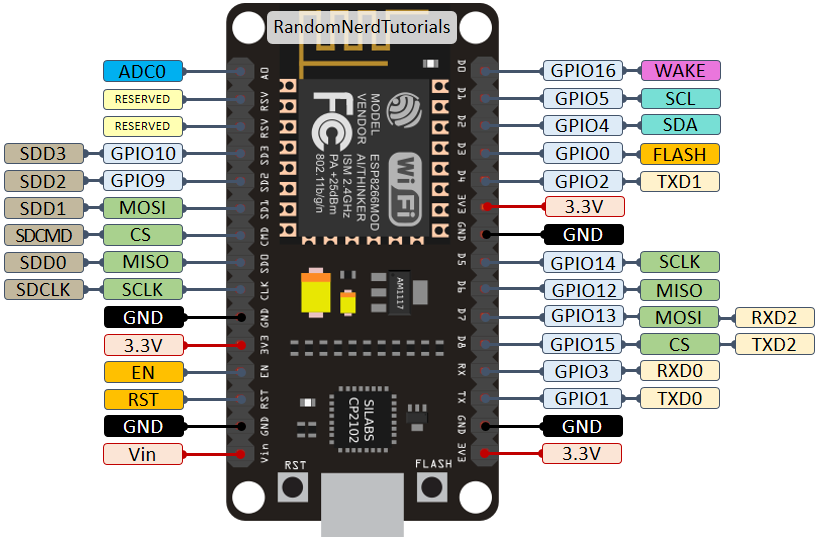
If you don’t set them on the code, they will be on the pins defined by default, as shown in the following figure (this is an example for the ESP32 DEVKIT V1 DOIT board (version with 36 GPIOS)—the pin location can change depending on the manufacturer).
To learn more about the ESP32 GPIOs and how to use them, read:
For means of comparison, here’s the pinout diagram for the ESP8266 ESP-12E NodeMCU Kit.
To learn more about the ESP8266 GPIOs and how to use them, read:
PWM, ADC, and More
You can set PWM signals in any GPIO with configurable frequencies and duty cycle set on the code.
When it comes to the analog pins, these are static, but the ESP32 supports measurements on 18 channels (analog-enabled pins) versus just one 10-bit ADC pin on the ESP8266. The ESP32 also supports two 8-bit DAC channels.
Moreover, the ESP32 contains 10 capacitive sensing GPIOs, that detect touch and can be used to trigger events, or wake-up the ESP32 from deep sleep, for example.
The ESP32 supports Bluetooth communication protocol by default, while the ESP8266 doesn’t.
Arduino IDE – ESP32 vs ESP8266
There are many ways to program the ESP32 and ESP8266 boards. Both boards can be programmed with the Arduino core using the Arduino IDE or other IDEs (like VS Code with the PlatformIO extension).
These are good news, especially for those used to program the Arduino board and are familiar with the Arduino “programming language”.
Getting started with the ESP32 or ESP8266 using Arduino IDE and have your first project running is very simple. You can follow these guides:
Although you can program both boards using Arduino IDE, they might not be compatible with the same libraries and functions. Some libraries are just compatible with one of the boards. This means that most of the time, your ESP8266 code will not be compatible with the ESP32. However, usually, you need to make a few modifications.
We have a dedicated list of free tutorials and projects for the ESP32 and ESP8266 boards using the Arduino IDE that you might found useful:
MicroPython Firwmare – ESP32 vs ESP8266
Another popular way of programming the ESP32 and ESP8266 boards is using MicroPython firmware.
MicroPython is a re-implementation of Python 3 targeted for microcontrollers and embedded systems. MicroPython is very similar with regular Python. So, if you already know how to program in Python, you also know how to program in MicroPython.
In MicroPython, most Python scripts are compatible with both boards (unlike when using Arduino IDE). This means that most of the time, you can use the same script for ESP32 and ESP8266.
You can get started with MicroPython firmware on the ESP32 and ESP8266 very quickly by following our free guides:
- Getting Started with MicroPython on ESP32 and ESP8266
- Getting Started with Thonny MicroPython (Python) IDE for ESP32 and ESP8266
We also have a list of free projects using MicroPython with the ESP32 and ESP8266 boards:
Need Resources to Get Started?
If you want to get started with the ESP32 or ESP8266, you can take a look at our courses and projects:
- Learn ESP32 with Arduino IDE
- Home Automation Using ESP8266
- MicroPython Programming with ESP32 and ESP8266
- Free projects for: ESP32 or ESP8266 or MicropPython
ESP32 or ESP8266?
So, at this point you may be wondering: Should I get an ESP8266 or an ESP32?
It really depends on what you want to do. There is space for both boards, and both have pros and cons.
The ESP8266 is cheaper than the ESP32. Although it doesn’t have as many functionalities, it works just fine for most simple DIY IoT projects. However, it has some limitations in the GPIO mapping, and it might not have enough pins for what you intend to do. If that’s the case, you should get an ESP32.
The ESP32 is much more powerful than the ESP8266, comes with more GPIOs with multiple functions, faster Wi-Fi, and supports Bluetooth. However, many people think that the ESP32 is more difficult to deal with than the ESP8266 because it is more complex. On the contrary, in our opinion, it is as easy to program the ESP32 as the ESP8266, especially if you intend to program it using the “Arduino language” or MicroPython.
The ESP32 has some cons too. The ESP32 is more expensive than the ESP8266. So, if you’re building a simple IoT project, the ESP8266 might do the trick for a lower price. Additionally, because the ESP8266 is “older” than the ESP32, some libraries and features are better developed for the ESP8266, and you’ll find more resources (forums, people with the same issues, and how to solve them, etc.). However, as time goes by, the ESP32 is being widely adopted, and these differences in terms of development and libraries won’t be noticeable.
My personal experience: in 2021, I use almost exclusively the ESP32 for IoT projects. It is more versatile, and it comes with much more functionalities like Bluetooth, different wake-up sources, many peripherals, and much more. Additionally, the price difference is not a big deal, in my opinion. Once you move to the ESP32, you won’t want to go back to the ESP8266.
Wrapping Up
We hope you’ve found our analysis ESP32 vs ESP8266 useful.
Just to wrap up the main differences between the ESP32 and ESP8266:
- The ESP32 is faster than the ESP8266;
- The ESP32 comes with more GPIOs with multiple functions;
- The ESP32 supports analog measurements on 18 channels (analog-enabled pins) versus just one 10-bit ADC pin on the ESP8266;
- The ESP32 supports Bluetooth while the ESP8266 doesn’t;
- The ESP32 is dual-core, and the ESP8266 is single core;
- The ESP8266 is cheaper than the ESP32;
- The ESP8266 has a wider community (although we don’t think that at this point, the difference is that relevant);
- For many IoT and Wi-Fi projects, the ESP8266 can do the job for a lower price;
- Both boards can be programmed with the Arduino core using Arduino IDE or other supported IDEs.
- Both boards support MicroPython firmware.
You might like reading the following ESP8266 and ESP32 related articles to have an idea of the selection of the most popular ESP32 and ESP8266 development boards:
So, if you’re a beginner, should you get started with the ESP32 or the ESP8266? At this point, we definitely recommend getting started with the ESP32 instead of the ESP8266. However, if you already have an ESP8266 board, you can get started with that board and then make the shift to the ESP32.
We have a vast selection of projects with these boards in the Random Nerd Tutorials blog to help you get started:
Thanks for reading.
[Recommended Course] Learn ESP32 with Arduino IDE
Register in our brand new ESP32 course with Arduino IDE. This is our complete guide to program the ESP32 with Arduino IDE, including projects, tips, and tricks! The registrations are open, so sign up now.
 [eBook] Home Automation using ESP8266 »
 [Course] Build a Home Automation System »
 [Course] Arduino Step-by-Step Projects »
Leave a Reply